This comprehensive guide is designed to assist you in integrating ALMEFY as your Identity Provider (IdP) on Invision Community, utilising OIDC, enabling Single Sign-On (SSO). We'll walk you through the necessary steps to ensure a seamless and secure setup. Please also refer to the Invision Community documentation for further details.
Prerequisites
- Admin access to your ALMEFY Hub at
<subdomain>.hub.almefy.com - An Invision Community instance
- Ad account with access to the AdminCP
Setup Overview
We try our best to keep these guides updated but can not anticipate when platforms might update interfaces, or change available options for configuring SSO.
Though setting up ALMEFY as your IdP generally follows the same steps for all platforms.
- Configure Endpoint – Set up the specific details of your endpoint in the ALMEFY Hub.
- Configure Platform – Adjust your platform’s settings for compatibility with the ALMEFY endpoint.
- Copy Metadata – Transfer the necessary metadata from your platform to the ALMEFY Hub for secure integration.
Each step corresponds to the options in the left column of the ALMEFY Hub interface.
If you find any inconsistencies in this guide, please let us know via our contact form.
Setup
Please note: the steps in the left column of the Endpoint Creation screen in the ALMEFY Hub correspond to the same as in this guide.
Step 1. ALMEFY SSO Endpoint Configuration
- Create a new Endpoint in the ALMEFY Hub by clicking the
Add Endpointbutton in the top right of theEndpointspage. - Select the Invision OIDC Preset
- (Optional) Rename the endpoint and the endpoint id if you do not want to use the default.
Endpoint URI: Enter your site's login URL, e.g.https://<yourdomain>.com/. This is the URL where ALMEFY will send you when you log in athttps://<subdomain>.sso.almefy.com.Secret: Either enter a secret or let ALMEFY generate one for you by pressingGenerate Secret. The secret is needed to encrypt the communication between ALMEFY and your Invision site.- Keep the endpoint configuration options open and continue with Step 2.
Step 2. Invision Community Configuration
More details can be found in the Invision Community documentation.
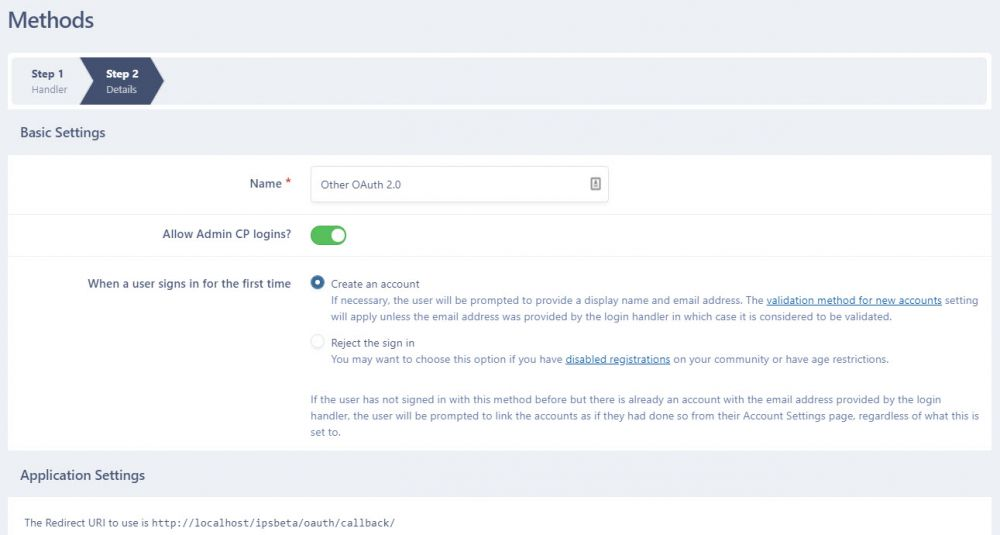
- Log into your Invision Community AdminCP.
- Go to
System -> Settings -> Login & Registration -> Method - From here, select the
Create new, thenOther OAuth 2.0and click continue. Name: EnterALMEFYto easily find the settings again later.Allow Admin CP logins: Set to true (Recommended)When user logs in for the first time?: SelectCreate account, so you may create accounts from within the ALMEFY Hub (Recommended)- Move to the
Application Settingssection - Copy the
Redirect URI. We will need it later. - From the
Step 2.section in the ALMEFY Hub Endpoint creation, copy and paste the following fields:
| Invidion field | ALMEFY Hub field |
|---|---|
| Client ID | Endpoint ID |
| Secret | Secret |
| Scope | Scope |
| Login Endpoint URL | Auth URL |
| Userinfo Endpoint URL | User Profile URL |
| Token Validation Endpoint URL | Token URL |
| End Session Endpoint URL | Logout URL |
| Identity Key | Subject |
- Move to the
Appearance Settings- These relate to the way the button looks, which is used for logging in. Set ALMEFY as text and choose a color and optionally a logo for the login button. - Move to
Account Management- These are preferences related to how logins act when it encounters things such as display names changing, emails changing, and whether or not to show the login method within your members account settings.

Step 3. Configure Invision Community Metadata in ALMEFY
- Navigate back to the ALMEFY Hub Endpoint creation page.
- In the
Step 3.section, paste theRedirect URIyou copied earlier in theApplication Settingssection in the Invision AdminCP. It should look something likehttps://<yourdomain>.com/ipsbeta/oauth/callback/. - Click "Add Endpoint".
- You are done!
Test & Troubleshoot
To ensure that ALMEFY has been correctly set up as your Identity Provider (IdP), you can test the login in two ways:
- Platform Login Page: Visit your Invision Community login page and check if the ALMEFY Login option is visible and functional by clicking on it and scanning the ALMEFY QR Code with the ALMEFY App.
- ALMEFY SSO Page: Go to
<subdomain>.sso.almefy.com, sign in with the ALMEFY App, and choose your newly enabled platform to test the authentication process.
If you encounter any issues:
- Review this guide to make sure all steps were followed correctly.
- Consult the Invision Community documentation for specific setup and troubleshooting instructions.
- Try to contact Invision Community support and see if your issue can be resolved.
- If you still need help, please fill out our contact form for support.
Conclusion
Congratulations on successfully setting up OIDC authentication with ALMEFY as your Identity Provider! You are now equipped to offer users a secure and convenient single sign-on experience.
